|
It's official, the holiday season has begun!! Since Thanksgiving was two days ago, my family has already set up our Christmas tree and decorations all throughout the house :) But it was much needed because it got me out of my food coma from the day before. For thanksgiving, I made these sautéed brussel sprouts with bacon as one of the MANY sides we had. I developed this recipe last year, and they are always a hit! It's a one-pan, treat-yo-self, special occasion, holiday dish. Here's what you'll need: You Will Need:
Once hot, add in the chopped bacon to the pan and sauté until golden brown and crisp. Remove the bacon onto a paper-towel lined plate, and lower the pan heat to medium-high. DON'T drain the oil from the frying pan! This is what we will be using to cook the sprouts and give them flavor. Add the brussel sprouts to the pan, and try to push them into a single layer, cut side down on the pan. This will allow them to brown and cook evenly. Add in the chopped rosemary, minced garlic, a generous amount of black pepper, and salt to taste (be mindful that the bacon and broth will also add to the saltiness). Continue to sauté the brussel sprouts, stirring them and rearranging them every now and again. When you notice the bottom of the pan start to dry up, add in the 3 tbsp of broth and the cranberry balsamic vinegar to deglaze the pan. The brussel sprouts are done cooking when they are tender enough for a fork to go through, but not mushy, and the cut sides have browned. Add back in half of the bacon and stir to combine. Pour the Brussel sprouts into a serving dish, top off with the remaining bacon, and enjoy! 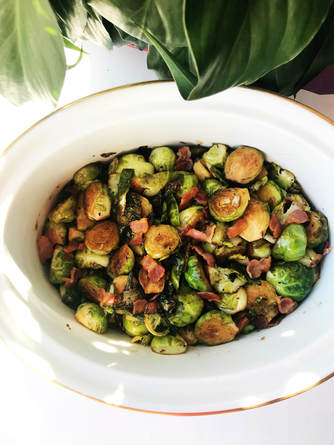 I don't know what it is, but I'm usually not a huge soup person. I think it's due to the fact that I'm usually very hungry when I eat, and I just bypass soup for more hearty foods. That, and I hate waiting for it to cool down! However, today is the first day the temperature has really dropped from the 80 degree weather on Monday, to the not so sunny 50 degree weather today (gotta love New England!), so I decided to take a break from studying today and did the unusual: make some soup for lunch! I was cold and wanted something to warm me up, so I pulled out some kale, a potato, and some cannellini beans and what I came up with was super easy to make! Here's what you'll need:
To start, heat the olive oil in a small pot over medium-high heat, then drop in the chopped onions and clove of garlic. Stir until the onions become translucent, then add in the potatoes and beans. Cook for another two minute, occasionally stirring, until the potatoes have started to soften. Season with salt, pepper, and oregano. Next, add in the water and 1/2 the bouillon cube (or the stock) and stir to combine. Drop in the kale, and bring the soup to a boil. Once boiling, lower the heat to medium-low, cover, and let simmer for 20 minutes, until the kale is tender. Enjoy! I added some grade pecorino romano cheese on top for added salty-nuttiness and it was perfect :) 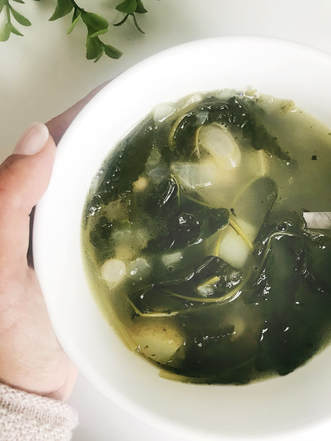 To me, nothing screams old-school childhood than polenta with sautéed greens on top. I remember my grandma making this for lunch when she was babysitting my sister and I, and my mom making it for dinner whenever we needed a quick meal. Polenta was ALWAYS stocked in the pantry! Polenta is an Italian "porridge" made from boiled cornmeal that is often topped off with grated cheese and served with sautéed veggies, or it can be fried like a cake and served with sauces like pesto on top. If you go for the version shown below that I made for dinner, the consistency is similar to grits but how "runny" you make the polenta is up to personal preference. My Nonna likes it a bit thicker while my mom likes it more fluid, but you have to be careful when cooking it because it can thicken up quick! It takes 10 minutes max to make the polenta, and the longest part is waiting for the water to boil! Here's what you'll need: You Will Need:
Since polenta is really up to personal preference, some of these measurements are up to you. To start, fill a large pot with water, salt, and set on the stove to boil. While the water is heating up, clean the broccoli rabe: - Break off the bottom inch of the stems and throw out any leaves that look browned or slimy. - Rinse and drain. Once the water comes to boil, drop in the broccoli rabe and cook for no more than 10 minutes, until the stems softened but not mushy. Remove the leaves form the water and set in a colander to drain. Using a medium frying pan, coat the bottom with olive oil, heat over medium-high heat, and add in two of the garlic cloves, cooking until lightly golden brown. Add in the broccoli rabe, season to taste with salt and pepper, and sauté for about 5 minutes, until the leaves shrink a bit more in size and the stems are not chewy. To make the polenta, coat the bottom of a medium saucepan with olive oil, heat over medium-high heat, and add in the remaining two garlic cloves, cooking until golden brown. Next, add the water to the pan, and season with salt and pepper. Once the water comes to barely a simmer with just a few bubbles popping on the surface, whisk in 1/2 the bag of the polenta a little at a time.
 I'm sure I can guess what you're thinking: "why are these muffins 'free' of so many ingredients?". Well to answer that question, recently I've noticed that some of my favorite foods are causing me discomfort, and after catching up with my cousin said the same thing. While I don't follow a particular diet to eliminate uncomfortable symptoms I get with eating certain foods, my cousin got tested for a few food allergies and found that among others, she is allergic to gluten, dairy, eggs, and flax- all ingredients that are used in breads, breakfast foods, and baking. Because of this, she asked if I could think of any recipes she could make for breakfast, so I put my baking skills to the test. Flax is commonly used as an egg substitute in vegan cooking because it creates a gelatinous texture similar to that of an egg white, when soaked in water. However, since my cousin is allergic to both eggs and flax, I decided I would try out the next best thing I could think of that would create a similar texture in the batter: chia seeds. This then led me to the idea of lemon poppy seed muffins, and I wondered if I could use the chia seeds as both an egg substitute and a poppy seed substitute. Surprisingly, it worked! The muffins turned out moist, lemony, and with the perfect texture of a muffin. I tried them out on my sister, too, and she said they tasted exactly like a lemon poppy seed muffin; you couldn't even tell they were gluten free. It's also almost an added to use chia seeds, because they are high in omega-3 fatty acids, a great source of fiber, and contain some protein and iron! Here's what you'll need: You will need: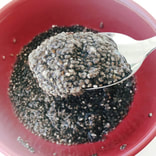
Begin with preheating the oven to 375°F, and line a muffin tin with paper cups, or lightly spray with nonstick cooking spray. In a small bowl, combine 2 tbsp. of chia seeds and 6 tbsp. of water, stir, and let sit for about 5 minutes, until a thickened, gel-like substance has formed. Try not to let the seeds sit for more than 5 minutes, however, because then the mixture can thicken too much. It should look something like this -> Next, in a mixing bowl combine the flour, sugar, baking powder. baking soda, salt, and lemon zest. Whisk until evenly combined. Then, add in the lemon juice, vanilla, cider vinegar, vegetable oil, and almond milk, and chia seed egg, mixing it with a spatula until combined. Mixture shouldn't be lumpy or too thin. Fill the muffin tins 3/4 of the way and bake for 20-25 minutes or until golden brown and a toothpick comes out clean (I baked them for 23 minutes). 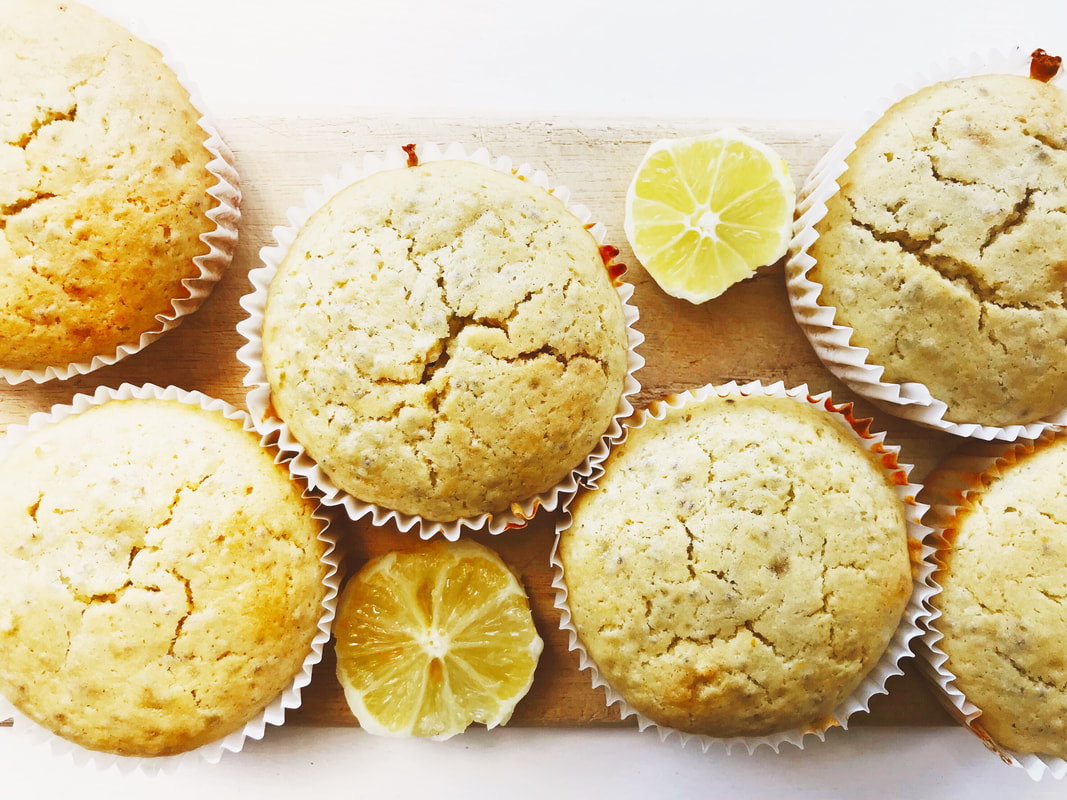 I'm literally SO excited to share this one with you guys! This is one of my favorite recipes that I created last summer and it's the perfect meal for warmer weather, even though it is a chili. I've tried this recipe out a few times and recently realized putting sour cream on top is the BOMB! I also wanted to make a meal for dinner that was light, filling, and nutrient dense since my body has not been happy with what I've been eating recently (oops!). I used lentils which are filled with fiber to help keep your digestive system happy, keep you fuller longer, and they are a good source of protein alongside having SO MANY vitamins and minerals that also help to maintain blood sugar levels. I also added in some turmeric powder which helps to combat inflammation, and a bit of spice to help spike my metabolism. Overall, this is the perfect vegetarian dish that's loaded with good-for-you ingredients. You Will Need:
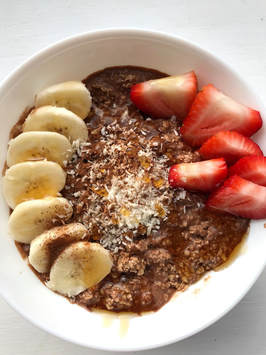
Begin by rinsing the lentils, and set them aside to drain. In a medium sauce pan, lightly coat the bottom with olive oil, and heat on medium-high. Once hot, add in the garlic and onions, and cook until lightly brown- about two minutes. Add in the carrots, celery, sweet potato, and tomato, and cook another 3-5 minutes, stirring regularly. Next, add in the rinsed lentils and stir until they are coated in oil, mixing for about a minute. Add in the broth, spices, lime juice, and stir to combine. Cover the pot and let cook until majority of the liquid is absorbed and the lentils are tender, about 15-20 minutes. Stir occasionally. Top it off with chopped scallions and sour cream if desired! 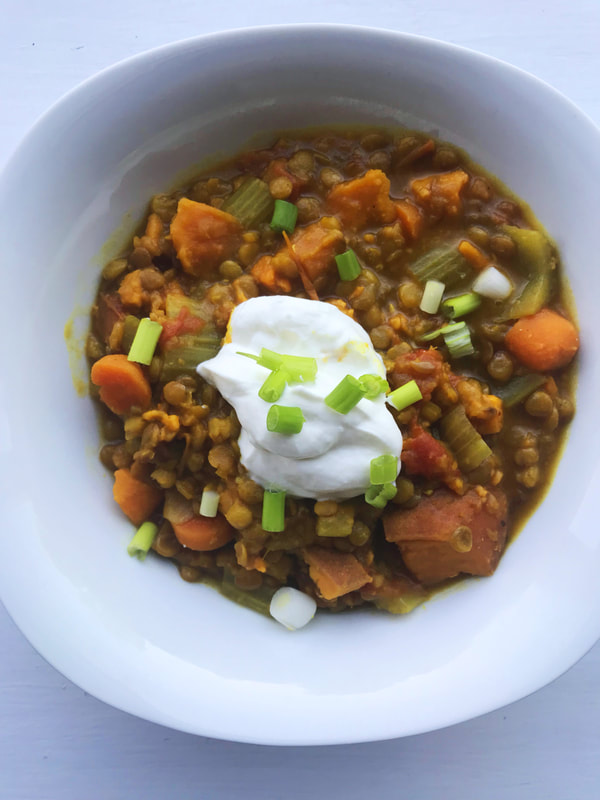 So for those of you who know me (and for those of you who can tell from my instagram feed) I LOVE oatmeal for breakfast. It's so quick and easy to make, and you can add virtually whatever toppings you want to it. Especially if I'm in a rush in the morning, it's so easy to grab a jar of overnight oats out of the fridge and be on my way. This gave me the inspiration to test out 5 days of overnight oats this past week, with hopes of getting to my class on time and still eating breakfast. I also documented my week on my instagram page @eat_everything_good, so check it out :) I've already talked about my standard go-to fool-proof overnight oat recipe on the blog before, but I wanted to take it a step further this week and focus on flavors instead of just toppings. You can also check out my original overnight oats blog post to see the typical way I make them, and what I usually use to top them off with. But for these past 5 days, I made oats that were all naturally sweetened, made with simple ingredients, and different flavors. Here's how it went: Monday- Carrot Cake Overnight Oats
I topped it off in the next morning with chopped raw walnuts and unsweetened coconut flakes, and just like that, you have carrot cake for breakfast!  Tuesday- Raspberry Lemonade Overnight OatsI've featured this one on my instagram before, so here's the recipe!
I topped this one off with some unsweetened coconut flakes and gogi berries! 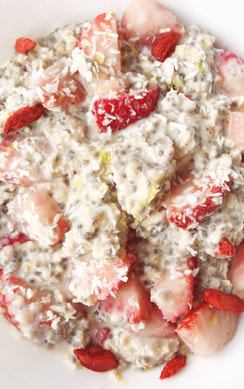 Wednesday- Coccoa-Banana Overnight OatsBecause who doesn't love chocolate for breakfast?! I also am indecisive and love both bananas and strawberries paired with chocolate, so why not add all of it in and get your fruits with breakfast ;)
 Thursday- Peach CobblerOkay, so this one is just a small step up form the others in difficulty, but that's just because it requires you microwave the peaches to make a peach compote. Maybe not the best one to grab from the fridge and head out the door if you're in a rush, but it's entirely worth the extra 5 minutes to prepare!
(If the mixture is on the thinner side and you would prefer it to be thicker, just add a tiny amount of cornstarch or arrowroot to thicken.) I also topped it off with some orange and ginger Siggi's yogurt which went with the cinnamon and nutmeg really well.  Friday- PB&J Oats
- using an empty PB jar to make the oats in. - melting 2 tbsp. of PB and swirling it in I went for the second option and made the oats with all of the ingredients except for the peanut butter and jam, then topped it all off with the PB&J the next morning.  I don't know about you guys, but for me, when the weather gets warmer I instantly am more motivated to eat fresh fruits! Maybe it's because they're in season, easier to find, and refreshing when its hot out haha. But since I also love to bake A LOT, in the warmer months I try to bake and cook with fruits when I can. Today I made these simple whole wheat blueberry scones that use honey as the sweetener, siggis yogurt to cut down on the butter content, almond milk so they are dairy-free, and whole wheat flour for added fiber. It only took about 18 minutes to bake them and about 10 minutes to prep, so this was the perfect brunch/snack item to bake for this coming Memorial Day weekend! They also aren't overly sweet, so feel free to adjust the honey to taste, and you can even experiment with something like maple syrup. Here's what you'll need: You Will Need:
To start, preheat the oven to 425°F. Line a cookie sheet with parchment paper. In a medium bowl, combine the flour, baking powder and salt. Stir to combine. Add in the cubed butter, and using a fork, mash it in to the flour. The goal is to create a crumbly texture in the flour, so make sure there are no large butter chunks remaining. Next, add in the yogurt, honey, almond milk, and vanilla extract. Stir until just combined and the dough is in large crumbly chunks. There may still be some flour left over that didn't mix into the dough. Don't worry about mixing it in, we will combine it all together later. Add in the blueberries and stir so that they are somewhat distributed throughout the dough. Turn over the contents of the bowl onto the lined cookie sheet, and begin forming the dough into a circle about 1 in. thick. Don't be afraid to push down the dough when shaping it, just be mindful not to pop any blueberries. Once you are happy with the shape of the scone dough, use a sharp serrated knife to cut it into eight equal sections, keeping them all touching in the circle. Bake for 18-20 minutes, until the dough is golden brown on top and when you touch it, it isn't soft on the outside. Let stand for 5 minutes on the pan, then re-cut the slices if necessary. 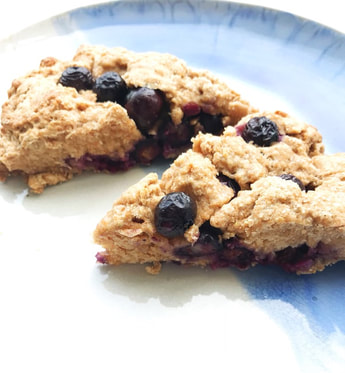 Sweet potatoes are by far one of my favorite veggies. They're so versatile and both sweet and savory, so I try to always have one lying around in my fridge for when I need it. Today I was looking for something quick and easy to throw together, and came up with the idea for a (healthy) loaded sweet potato! Packed with quinoa and topped with fresh herbs and avocado, this was the perfect lunch. Here's what you'll need: You will need:
To start, microwave or roast the sweet potatoes until tender. If microwaving, pierce the potatoes a few times with a fork, place them on a microwave safe plate, and cook for 12 minutes per potato, or until tender ( make sure to rotate the potato periodically). If roasting in the oven, wrap the potatoes in aluminum foil and bake at 450°F for 40 minutes or until tender. In the meantime, cook the quinoa and chop up the parsley, onion, and avocado. Once the sweet potatoes are cooked and cooled enough to handle, cut one in half lengthwise and scoop out into a bowl. (it works best if you do the filling for one potato at a time). Season to taste with salt, pepper, and garlic powder, and add in 1 tbsp. of lime juice. I also added in a little splash of the Tahini Goddess dressing, but that's totally optional! Mash all together, and add in 1 tbsp. of the quinoa. Scoop the filling back into the potato skin, and top with 1/2 tbsp. of parsley, some sliced onion, and feta cheese. Repeat using the second potato, and the remaining ingredients. 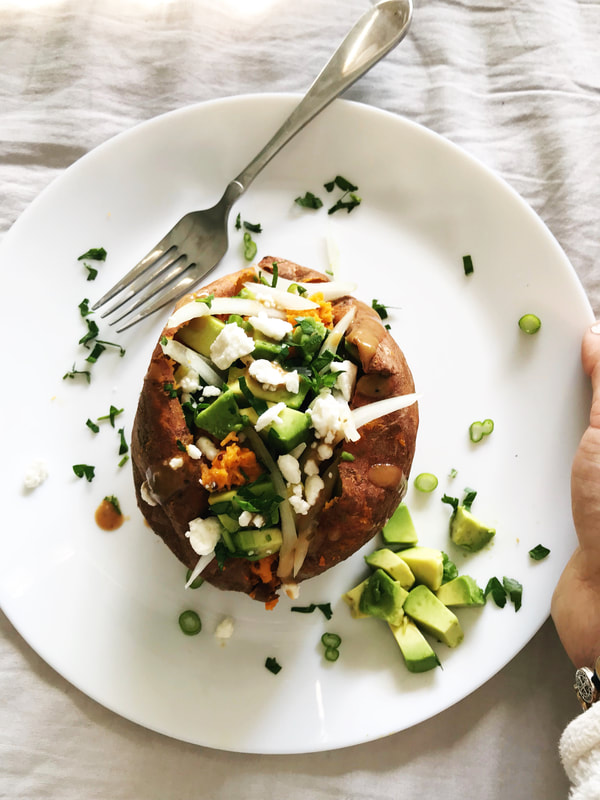 I don't know about you guys, but tacos are my go-to meal to make when I'm STARVING but also need something quick to make. I tested this recipe out for the first time last night after a spinning class, and it literally took me 20 minutes total! This meal is packed with both fruits and veggies, and the chicken is poached and cooked with minimal oil for a protein-packed dish made without excessive ingredients! Here's what you'll need: You will need:
To start, place the chicken breast in a large skillet and pour in enough chicken broth to just cover the chicken. Add in 1 tbsp. of the taco seasoning. Over medium-high heat, bring the liquid to a boil, and let boil for about a minute. The chicken will start to cook quickly. Reduce the heat to medium-low, cover, and let simmer for about 10 more minutes. In the meantime, begin on the mango-lime salsa. Chop up the tomato, jalapeño, red onion, and mango into similar sized chunks, then add to a bowl. It works best if the mango is ripe, so the flavor is there, but it still has a bite to it and isn't super soft. Mince the fresh cilantro/parsley, and add to the bowl. Next, add in 2 tbsp. of the lime juice, and 1/4 tsp. of salt. For a stronger lime flavor, add in a little zest from a fresh lime. Mix all together, and set aside. Once the chicken is done cooking, transfer it to a plate and shred it by pulling it apart with two forks. Season the chicken with 1/2 tbsp. of taco seasoning, salt to taste, and a light drizzle of olive oil. To assemble the tacos, I first heated the tortillas, but that's totally optional! Next, divide the chicken among the two tortillas, top with the mango-lime salsa, reduced-fat sour cream, shredded cheese, and slices of avocado, if desired.  Happy 2018 everyone! I hope the new year is already treating you well :) I had a very restful holiday season filled with family, and it was exactly what I needed after a busy semester at school. I made a few resolutions for this year, and one of them is to practice meal prepping some more as a way to have fresh, healthy foods ready for me. One problem I had with cooking last semester was feeling pressed for time while wanting to cook in between meetings, clubs, and studying. This year I hope to get better at this, and also hope to shop more effectively ;) Today, I decided to cook up some stuffed zucchini with what I had in my fridge for lunch, and it was the perfect meal since it's a warm 25 degrees out today! (seriously, this is the warmest it has been all week). I added some quinoa, chopped bell pepper, and spinach to the inside of the zucchini I scooped out, for a quick vegetarian meal packed with flavor. Here's what you'll need: You Will Need:
To start, chop the top stem end of the zucchini off, and cut in half lengthwise. Next, scoop out the insides, creating a ditch to stuff the zucchini. Chop the insides into rough cubes, and set aside for the filling. Place the zucchini halves on an aluminum foil lined baking sheet, brush with olive oil, and season with salt and pepper. Preheat the oven to 375 °F. Next, make the quinoa according to the package, using either water, or vegetable stock for added flavor (or a mix of both). Make sure to cook it until there is no liquid left; having too watery of a filling won't work. Chop up the bell pepper into small cubes, mince the garlic, and finely chop the parsley, if desired. Next, lightly coat the bottom of a saucepan with olive oil, and once heated, add in the minced garlic. Cook on medium-high heat until the garlic begins to brown. Then, add in the zucchini cubes and bell peppers, sautéing for about 2-3 minutes, until the zucchini is tender and the bell peppers start to soften, but still have a bite. As they are cooking, season with salt, pepper, and oregano to taste. Next, add in the cooked quinoa and stir until well mixed. Reduce the heat to medium. Add in the spinach, and keep stirring until the leaves wilt. It doesn't take much for spinach to wilt, so the steam and indirect heat should cook them quickly. Once all combined, season one last time if necessary, and stuff an even amount into each zucchini half, topping it off with the grated cheese, if desired. Cover the zucchini with aluminum foil, and bake for 15-20 minutes, until the zucchini are tender enough to bend when squeezed, but still have a bite to them. Serve topped with more grated cheese and chopped parsley, if desired.  |
 RSS Feed
